For the past few years, I’ve been interested in a more powerful digital photography
workflow solution than the brutish practice of shuffling JPG files around on my
hard drive and hoping for the best. I have really been seeking one (or more)
specialized programs which can handle the common photography tasks of organizing
photos from the moment they leave the camera to their final resting place on my
hard drive (and/or backup server), and performing common photo editing upon them
like curve adjustments and blemish removal. These solutions also needed to work
natively on Windows, integrate well with NAS solutions, and be capable enough
with RAW files. I was willing to pay for the software, but I didn’t want to have
to spend more than $75, and certainly not over $100, considering I am at best an
amateur photographer. I’m also mindful of my privacy.
After spending several hours researching the options available
to me, I have decided to use ACDSee Pro 10 as my one-stop shop.
Organizing vs Processing
There are two fundamentally distinct, but intricately related digital photography tasks:
image organization and photo processing.
Photo organization is the task
of organizing photos on a computer, whilst
photo processing is the task
of editing photos on a computer. (If this sounds familiar to you,
click here to skip to my analysis.)
Photo Organization
Organization, quite simply, is the task of filing all photographs onto one or
more computers with the goal of benig able to easily find, edit, and view those
photographs later. Generally speaking, more powerful photo organizers offer
greater flexibility and more useful ways of grouping, finding, and batch-editing
photographs. (The most powerful of these organizers essentially lend themselves
to a workflow called culling, which is the task of selecting photographs worthy
of keeping from a large photo shoot, and eliminating the rest.) Common, powerful
ways of organizing photos include face tagging and facial recognition, date tagging,
album making, and adding searchable keywords or tags. All of these different
organization styles require compiling a database of sorts within which to place
photo references and associated metadata (such as those faces, keywords, tags, and albums).
(It’s important to note that simply clumping files into folders on disk is not the
same as building a formal database system with a powerful way to interact with
many photos. Albums don’t exist without having ways of associating multiple
photos into a single unifying concept; one photo should be able to appear in
multiple albums without having multiple copies of that photograph on disk; the
unifying data which names those photo files (wherever they are) constitutes a
database.)
Photo Processing
Photo processing involves potentially destructive changes to digital photograph files
to alter their appearance in aesthetically pleasing ways. This runs the gamut
from minor geometric tweaks to altering the perspective and colors of a photo
to remove optical distortion and optical illusions. To enumerate some informal
tiers of photo processing capabilities:
- The most basic photo editing options, some of which are included with operating
system file browsers, include rotating photos, and sometimes cropping. Red
eye removal is basic and not included within file browsers but is essentially
taken for granted in even the most basic editors these days.
- More advanced editing capabilities which are often associated with
Adobe PhotoShop (but in reality are available in most photography oriented
image processors) include adjustments to white balance, level and color curves,
exposure and saturation, noise reduction, and sharpness adjustment. These
edits will often apply to the image as a whole, and change the parameters of
the image across the board, with some level of intelligence.
Although not strictly a holistic adjustment, editors in this tier usually
include at least a basic form of cloning and healing, which are used for tasks
like removing pimples from portraits and photos of people.
- More robust editors often include tools for controlling vignetting, chromatic
aberration, lens distortion, and sometimes even perspective changing and
liquification. These are powerful techniques for holistically changing how
specific local combinations of pixels appear within a digital image, and tend
to require more finesse than merely e.g. tweaking colors across the board.
- Very powerful editors like Adobe PhotoShop offer (in addition to the formentioned
clone and heal tools) local image editing, which allows an editor to select
portions of an image within which to apply edits exclusive to other portions.
This is commonly used for “face swapping”and selective sharpening
or lighting/saturation adjustments.
- Most decent editors support non-destructive editing,
wherein a file can be edited multiple times over hours, days, or weeks, without
requiring multiple destructive operations. The original file is preserved
as such, and the history of edits to that photo are serialized to either a
dedicated container file format, or else stored within a database, so that
the original photo is always available for further (similarly non-destructive)
tweaks.
- This isn’t even really a type of editing, so much as a different class of it.
Many powerful cameras can shoot what is called RAW,
wherein the camera faithfully records everything it saw when the photograph
was taken, with no compression or loss of detail. Although this level of detail
allows for edits that otherwise would be impossible (because far more granular
data is preserved in RAW than in other common formats like JPG), special software
is required for RAW processing. Each camera has a slightly
different way of storing what it saw, and RAW processing software either needs
to be made for/by a specific camera manufacturer to process that camera family’s
own RAW format; or else a third party must provide RAW processing for many
different RAW formats. A common reason to shoot photographs in the RAW format
is to recover dynamic range for an image with mixed lighting.
Typical Photo Database Types
Not every photo editor has a database (consider PhotoShop and Microsoft Paint),
but the best ones generally do. I’ve learned that the common database types are
one of fundamentally two distinct types:
- Indexes are databases which store references to files on computers, and
remember fast ways of finding them by tags, keywords, faces, dates, albums, etc.
The database here consists of the records of photo locations and metadata,
but the photos live outside of the database, and can be processed externally.
The index database is also often called a catalog.
- Some databases actually store within themselves all the user’s photographs.
This often allows for a more seamless editing experience for beginners or
simpler users, because the files
can be conceptually replaced with photographs with no loss of generality, and
photo editing photographs within the same database is simpler.
In this case, the photographs get copied into the internals of the database,
increasing the database size.
Programs Under Consideration
For my purposes, I really want the ability to have a pleasant viewing experience
of my photos from my program. I also want the ability to do fast lookups by date,
location, and person, and to create photo albums. As far as editing is concerned,
I would prefer the ability to do the common image editing tasks like lighting
and exposure adjustments, even on RAW files. Facial recognition is a big boon,
but I am willing to live without it, because of the sacrifices to privacy it
often entails.
Apple Photos
My most recent experience with a do-it-all program has been Apple Photos,
Apple’s newest iteration on photo management (it’s the fusion of the now end-of-life
iPhoto and Aperture programs). I’ve tinkered with it on my wife’s laptop a couple
of times, and overall, I think there’s a lot to like:
- It comes “free” with the operating system (so no marginal cost)
- It has both offline facial recognition and a tag system
- Freeform album creation, photo timeline, location map, and “smart” albums
- A reasonably complete set of photo editing techniques for a free editor, and
it even has rudimentary RAW support
However, there’s two primary strikes against it for me as well:
- Photos stores all of its photos in an opaque “database” folder inside a specific
user’s home directory. Although this has advantages (no micromanaging folder
layouts or locations, no duplicate photos, etc.), it comes with a disadvantage:
the database is essentially limited to the size of the available file system
of the underlying computer. The database can be placed on an external drive,
but then the program is essentially useless without a network connection to that drive.
Having a single, atomic database container limits this application squarely to
users who don’t mind storing their entire photo library on a single computer
- Obviously, Photos is only available for macOS; I use Windows, so this isn’t
really useful for me as a daily driver.
Google Picasa
The venerable Picasa program has a lot to like. It has many of the same capabilities
as Apple Photos above (although its offline facial recognition is more rudimentary
than Apple’s and especially Google’s most recent offerings). However, as it is
end-of-life, I’d rather not invest in beginning to use the program now. I’m also
uncertain of how advanced it can be for certain advanced photography workflows
(notwithstanding its free price). Picasa uses an index database over the file
system, but it’s not recommended to run it against network-stored photos. (Some
users also find that the database becomes unstable when moved between computers.)
Adobe Lightroom
One of the most widely acknowledged photography workflow programs out there is
Adobe Lightroom.
Lightroom sits in an interesting place – it is mostly a non-destructive
photo editor with an emphasis at batch processing of many photos at a time; and
it also has good indexing options like keywords and facial recognition through
its catalog (indexed database). The catalog here stores both the non-destructive
edit history of the imported photos, as well as their locations.
Whenever photos need to be removed from the catalog (will discuss below), they are
exported from the system.
However, some power users complain that the program can become sluggish when working with very
large sets of files, and so endorse exporting photos from the Lightroom catalog
when they are no longer needed in the spot. It sounds from this that Lightroom
is not really meant for long-term photo organization, although it can hold up
fine on large projects one-at-a-time.
That being said, Adobe has some of the best RAW processing and intelligent photo
processing algorithms in the business; Lightroom is considered the golden standard
for working and enthusiast photographers. If I was a working photographer, I would
probably shell out for Lightroom, but because I’m not, justifying the $150 for it
is a bit difficult for me. I took a hard pass, even though it’s a reasonable option.
Capture One Pro
I won’t mention more about Capture One
than to say that it’s considered better optimized and faster than Lightroom at
nearly everything Lightroom does. If Lightroom is for enthusiasts and professionals,
I assume Capture One is only for serious professionals. Not for me, but it looks nice.
PhotoShop Elements
In the opposite direction from Capture One is
Adobe PhotoShop Elements.
PhotoShop Elements (PSE for short) sits in an interesting place between PhotoShop
(just an editor) and Lightroom (30% organizer and 70% photo processor). It contains
the enthusiast features of PhotoShop itself (e.g. it’d never work for a serious
professional but it’s usually plenty for amateurs and enthusiasts) and has a
sidekick feature called the “organizer”. PhotoShop itself can do most of the requisite
photo processing that Lightroom can, although it’s less optimized for a photography
workflow and a little better at a generic graphic designer workflow. The Organizer
is neat in that it embeds a little database for common organization techniques,
including some of the facial recognition and timeline/mapping features from
competitors. As such, PSE is in a decent position for casual photographers
experimenting with portraiture or the like. However, don’t imagine that the organizer
works well with network drives, and its not-photographer-oriented workflow makes it
a weak choice considering it still costs $80.
ACDSee Pro
An almost unheard of program I found after serious sleuthing on the
Digital Photography Review forums
is ACDSee Pro.
It can be seen as either a more robust and lightweight alternative to Lightroom,
or as a more photography-centric (and lightweight) competitor to PSE.
It has a similar concept as Lightroom in that it can easily import photos into its
catalog (index) for processing and tagging (no facial recognition though).
And it has a fully-fleshed-out photography workflow with both non-destructive RAW
processing and JPG editing. Its sticker price is $100, which is a little
high considering that it’s gunning against the well-known PhotoShop Elements
which is “only” $80. However, it’s on sale this week for $50, which I consider to
be a fantastic price for what it offers.
Manage Mode
The “Manage” workflow of the app is an intelligent, photo-centric file browser.
Although this may not sound so powerful at first blush, the ability to combine
a local index of tags and categories with typical file browsing and a global file
cache ends up being far more fluid than it sounds at first blush.
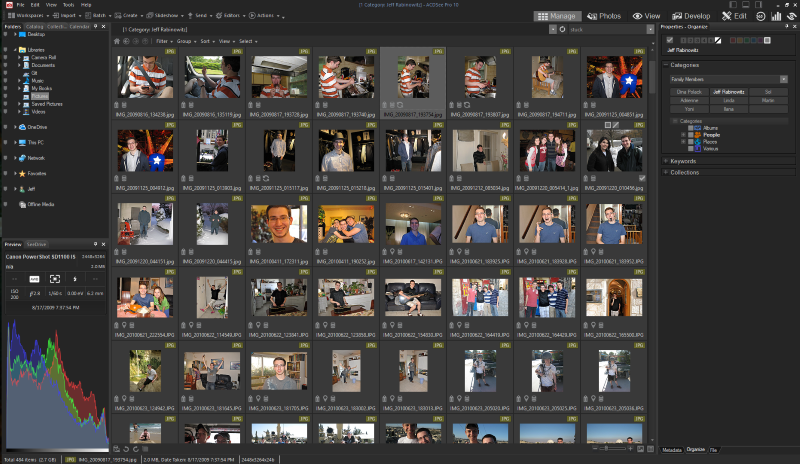
The ACDSee Manage mode is incredibly fluid for deft maneuvers around the photo catalogue.
This mode is almost completely analogous to Adobe Bridge
in its file-browser centrality. However, Bridge is (especially) meant to be a
graphic designer’s workhorse for punting files between programs like InDesign,
Premier, Illustrator, in addition to PhotoShop. As a dedicated program, ACDSee Pro
is more specialized for photography workflows because it is a single program.
(There’s a stripped down version of “ACDSee Pro” titled “ACDSee”, which is much
closer to Bridge in that it does not have powerful editing built in.)
ACDSee has another similarity to Bridge – all assets which have been examined
in the program are transparently and automatically indexed; but a user can batch import
entire drives into the database through a setup/settings option. This feature allows
one to set up all initial photos and have any subsequently taken ones get imported
on-the-fly. (A potential hiccup is that if photos are moved around outside of the
program, the existing references become orphaned and data can be lost.)
A workflow I very much like from ACDSee (which I assume Bridge and Lightroom also have)
is the ability to work with photos quickly from the moment a camera is plugged in
until the photos are ready for “shipping” to the internet or a printer. My workflow
looks like:
- Plug in the camera and import from it
- Filter by date and select desired photos to import
- Copy them to a staging folder. Add desired photos to the “image basket” (shopping cart)
and move them to a working folder. The staging photos which are no
longer desirable can be kept or purged.
- Do any editing upon the photos in the working folder and then copy them to a
destination/output folder.
- Optionally, upload the photos to Flicker/FaceBook/SmugMug/Zenfolio or copy
to a network drive.
Photo Mode
Like most other organizer/editors, it supports a primitive timeline and map view
(although its map view is more limited than most of the competition), not shown.
I’m not really sure what to say about this timeline viewing mode, otherwise. It’s
hard to jump from it into other modes in a “powerful” way, other than right clicking
on a single photo at a time. I think it’s nice to have but isn’t nearly as powerful
as the other modes.
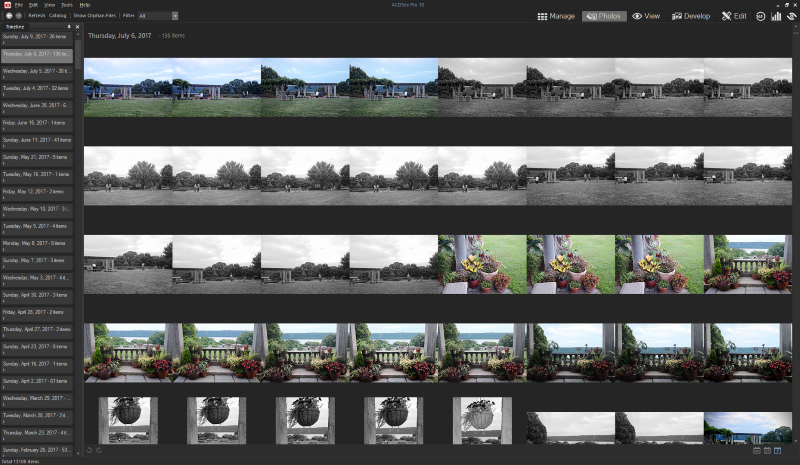
Although I find the Photo mode visually attractive, it’s not really meant for productivity work.
Develop and Edit Modes
These should be self-explanatory to anyone who has ever used Lightroom, but I’ll
go over this nonetheless. “Develop” mode is (especially but not exclusively) for
image-wide tweaks to properties like white balance, saturation, etc., in other
words, holistic tweaks. Develop mode is of particular interest for developers
shooting in RAW because most (all?) of the tweaks in Develop mode can be done
to RAW files without having to leave the RAW image (which sacrifices some level
of image detail by definition).
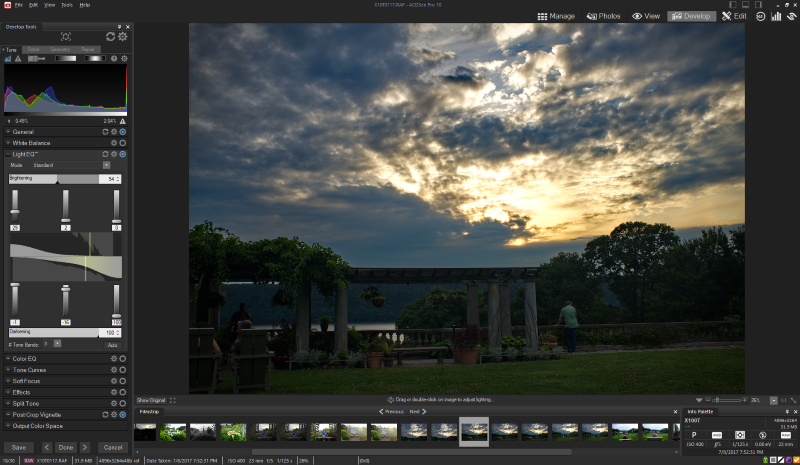
Develop mode is useful for 85% of photo processing a typical photographer does, in this case boosting dynamic range.
For most photos, I maybe want to do some cropping and noise reduction, followed
by tweaking some colors and exposure and lighting; Develop mode is ideal for this.
I especially like the Light EQ mode, which has intelligent sliders for continuously
adjusting between the original photo and more dynamic versions of it.
I’ve poked at Edit mode, which is useful for local editing (the “Ultimate” version
of the program also has layers but those aren’t so useful to photographers).
For good photography, it shouldn’t be necessary to lean heavily upon local editing
of photos for every single photo. That being said, local edits are a good way of
making the image “pop”, using techniques such as
dodging and burning.

Using the burn tool in Edit mode in ACDSee Pro.
Why I Chose ACDSee Pro
The photo editing provides non-destructive RAW editing and a very intelligent set
of lighting and level sliders. Furthermore, there’s included a basic facility for
local image editing for sharpness, saturation, etc. I was very impressed with how
much I was able to get done so quickly, without really having to mess around learning
special features or leaving my workflow. I can easily dive into some photos, even
RAW photos, play around a bit, save and return later, and when done, export everything
to a web album or photo scrapbook or the like. And it even works with my network server!
Although I only had a few days to play with it, I was so impressed with its combination
of features at its great price point that I was willing to commit to it long-term.
Its index database works well for my networked photography use case, is incredibly
quick and responsive to use, and results in good looking photos in record time for me.